How To Tarp a Roof & Prevent Leaking (Step-by-Step)
Whether there was a big storm that knocked some shingles off your roof or you are simply conducting a home renovation, learning how to tarp a roof is essential for every homeowner. A tarp is a piece of durable, waterproof material used to protect an exposed area or objects. You can use a tarp on your roof to help protect you, your belongings, and the interior of your house from being damaged or exposed to harmful elements.
If your roof has been damaged and isn’t tarped, it can become more damaged over time, leading to costlier roof repairs or replacement jobs. Learning the steps of how to tarp a roof can help you save money, protect your home, and take care of your interior belongings.
Steps on How To Tarp a Roof
Learning the basics of assessing your roof, gathering the necessary materials, tarping the roof, and identifying signs of a damaged roof are key to keeping the exterior of your home in good condition. Knowing the basics of emergency repairs can help hold you over before a permanent fix can be done and prevent roof leaks.
Assess the Roof and Purchase the Tarp
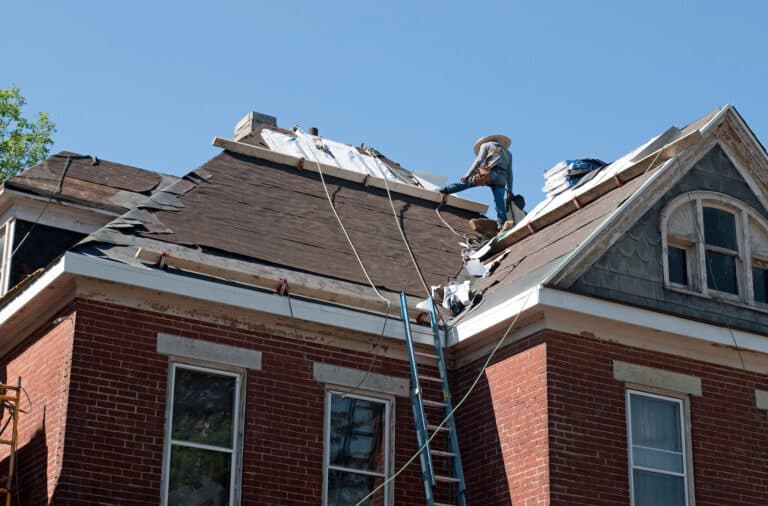
The first step of learning how to tarp a roof is assessing the damage to your roof. Damage can occur for multiple reasons, whether it was from a big hail storm or years of deterioration. Ensure you only assess the roof during good weather and avoid storms, windy days, or rainy days where the roof could be slippery.
First, you’ll need to locate the damage on the roof. Use a ladder to safely reach the roof and identify the damaged tiles or debris.
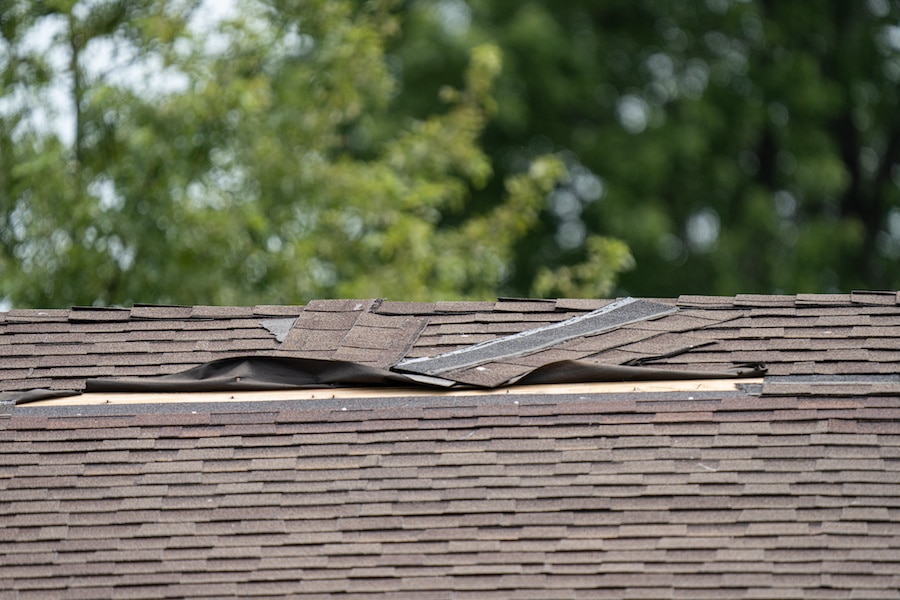
Next, you will need to measure the damage. Kneel on the roof and stay low to the ground. Use a tape measure to determine the dimensions of the damaged area and keep a note of them for later use.
Visual references are key, so be sure to take photos of the damage. While assessing the roof, use a camera or smartphone to take pictures of the additional damage to send to your insurance company.
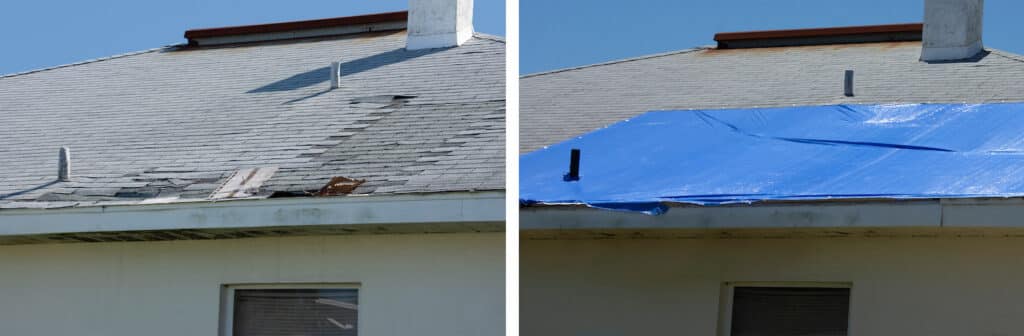
Choose a suitable tarp that can cover the entire damaged area. Make sure to select one that is bigger than the dimensions measured and that it’s long enough to hang over the side of the roof. This is essential, as it helps water roll off the tarp without getting caught underneath and causing leaks or water damage to the inside of your home.
Another factor to consider when buying a tarp is the durability and strength required. If more severe weather is expected shortly, the tarp will need to be extremely heavy duty. If the tarp is a short-term, temporary fix and there is no bad weather in the foreseeable future, it’s fine for the tarp to be a little less durable.
Gathering the necessary equipment is the last step in preparing to add the tarp. Make sure you have the following:
- Camera or smartphone to take photos
- Ladder and safety equipment
- Suitable tarp (the one you just purchased)
- 2×4 wooden boards (lumber)
- Roofing shovel or item to remove debris from the roof
- Cap nails
- Screws
Position the Tarp
Once you have assessed the scene and purchased the materials, it is time to position the tarp on the roof for the initial installation. Since the tarp is a big and heavy material, make sure you have people to help you move the tarp.
Climb the ladder and use a broom or brush to clean the debris off the roof to make a clean surface. Unroll the tarp from its packaging and lay it over the damaged section. Make sure there’s 4’ of space on each side of the tarp.
Secure the Tarp
The last phase of learning how to tarp a roof is to secure the tarp to the roofing material to prevent it from blowing away. Secure the tarp to the roof by using four 2×4 plywood boards at the ends of the tarp. Make sure 2’ sticks out each side of the tarp to ensure it is nailed down correctly. Then, attach the tarp and the board by using your hammer to drive the nails into the board.
Next, extend and wrap the tarp around the wooden boards so the boards are covered on all sides. Place screws through the tarp and the boards to secure them to the roof itself. Using screws and a screwdriver, drive the screws through the tarp and boards so they are connected to the right location on the roof.
Continue to add more boards to the tarp so that it is secure and will not blow away. Add four more 2×4 boards perpendicular to the previous boards and screw them into the roofing material.
Another vulnerable place that users need to add boards is under the overhang of the tarp. Bring the overhang onto the roof and add a 2×4 to the bottom of the overhang for added security.
FAQs: Tarping a Roof
Homeowners need to learn the basics of how tarps can save damaged roofs from succumbing to rain and wet weather.
By using the proper tools, homeowners can forego a professional’s services and simply do the job themselves.
How Much Wind Can a Tarp Withstand?
Purchasing a tarp that has heavy-duty material, reinforced corners, and strong edges can increase the likelihood of longevity—even during storms.
What if There Is a Tear or Hole in My Tarp?
If a tear or hole develops in the tarp due to inclement weather or friction against the roof, the best solution is to purchase another tarp to place over the damaged section.
Can I Put a Tarp Over a Skylight?
Skylights can add natural light to your home. However, over time, they can develop cracks and leaks. You should tarp the skylight immediately as soon as you notice any sign of water damage in your house.
The best way to immediately stop a leak is to cover it with a tarp. Lay the tarp flat over the light, use an adhesive to secure it to the roof, and place the boards underneath for added security.
Make sure the tarp hangs over the edge to prevent runoff water from dripping inside your home. Secure the boards to the roof with nails, and you are good to go!

Written By:
Keiron Mohamed
Blog
Recent Articles